
TVAROHOVÁ BÁBOVKA A LA ŠTOLA S CITRONOVOU POLEVOU
18. prosince 2023


Pokud si chcete odpočinout od cukroví, ale přesto upéct něco vánočního, vyzkoušejte tuto tvarohovou bábovku à la štolu. A pokud ne bábovku, můžete z tohoto těsta upéct rychlou štolu.
Bábovku můžete jen tak pocukrovat anebo ji přelít citronovou polevou.

TVAROHOVÁ BÁBOVKA A LA ŠTOLA S CITRONOVOU POLEVOU
SUROVINY
(vyjdou spíš do menší formy na bábovku nebo na 2 menší štoly)
BÁBOVKA
500 g hladké mouky
1 prášek do pečiva s vinným kamenem
2 lžičky vanilkové pasty
150 g cukru krupice
150 g měkkého másla
nastrouhaná kůra z 1 citrónu
špetka soli
2 vejce
250 g měkkého tvarohu, polotučného (ve vaničce)
50 g kandovaného ovoce
hrst rozinek
hrst sušených brusinek
CITRONOVOÁ POLEVA
5 lžic moučkového cukru
1 lžíce horké vody
1/2 lžíce citronové šťávy
POSTUP
1) Na těsto si vyšleháme máslo s cukrem do světlé barvy. Přidáme prosetou mouku, prášek do pečiva, vanilkovou pastu, kůru z citronu, sůl, vejce a tvaroh. Vypracujeme hladké nelepivé těsto (případně přidáme ještě trochu mouky).
2) Rozválíme na větší silnější obdélník, posypeme kandovaným a sušeným ovocem. Rukama znovu propracujeme a necháme 30 minut odležet.
3) Troubu předehřejeme na 170°C.
4) Formu vymažeme máslem a vysypeme hrubou moukou. Vložíme těsto, trochu přimáčkneme do formy, abychom natvarovali formu. Vložíme do trouby a pečeme 60 - 70 minut - doba pečení bude záležet na formě a hloubce těsta.
5) Upečení vyzkoušíme špejlí. Vyndáme, necháme vychladnout cca 10 minut, vyklopíme z formy a necháme zcela vychladnout.
6) Přelijeme citronovou polevou - moučkový cukr zalijeme citronovou šťávou a po troškách přidáme vodu a vytvoříme tekutou hustší polevu.
Pokud budete péct štolu…
7) V případě štol těsto rozdělíme na poloviny a z každé vyválíme silnější plát, posypeme kandovaným a sušeným ovocem. Rukama znovu propracujeme a necháme 30 minut odležet. Z těsta vyválíme znova na obdélník (2 cm vysoký). Štolu vytvarujeme přeložením okrajů proti sobě a podélnou stranou ještě přehneme na polovinu. Přeneseme na plech vyložený pečícím papírem. Vložíme do trouby a pečeme cca 60 minut.
8) Po upečení potřeme teplou štolu rozpuštěným máslem a posypeme silnější vrstvou moučkového cukru. Není potřeba balit do alobalu a nechávat uležet, můžete jíst hned.
Recept k vytištění najdete zde.
.jpg)


.jpg)
ZÁVĚSNÝ VĚNEČEK S PERNÍČKY
11. prosince 2023


Perníčky nemusí být pouze k jídlu. V dřívějších dobách se perníčky vyráběly jako dekorace, protože suroviny na jejich pečení byly poměrně drahé. Čím víc se vracím k přírodnějším a jednodušším dekoracím, tím víc se mi perníčky líbí jako dekorace.
Už několik roků používám perníčky jako dekoraci na stromeček. Mám vždy radost, že mám na stromečku ručně vyrobené dekorace a nějak si to více užívám. Přemýšlela jsem, jak jinak ještě perníčky využít. Toužím vytvořit chaloupku, ale to bych musela s vánočním dekorováním začít o dost dřív, protože v prosinci pak nějak nezbývá moc času.

Dalším nápadem bylo použít perníčky na věneček. Kromě klasického jsem delší dobu toužila vyrobit si na Vánoce závěsný věneček a letos jsem jej konečně uskutečnila. Pokud si budete chtít vytvořit závěsný věneček, myslete už u pečení perníčků na vytvoření dostatečně velkých dírek pro stužky nebo provázky.
Na zdobení jsem použila stejné perníčky, ale určitě příště vyzkouším kombinaci různých tvarů a druhů. A pokud nebude chtít perníčky zavěšovat na věneček, použijte je jako girlandu.

ZÁVĚSNÝ VĚNEČEK S PERNÍČKY
CO BUDETE POTŘEBOVAT
- věneček
- stužky nebo provázky na zavěšení perníčků
- aranžérské sponky do věnce pro přichycení stužek s perníčky
- perníčky
- nůžky
INSTRUKCE
Nejprve si připravíme věneček – vyrobte si jej podle vašeho přání, já mám slaměný s jehličím a eukalyptem. Protože bude věneček viset, je potřeba pamatovat na to, že spodní strana, kterou většinou necháváme bez jehličí, bude směřovat ke stropu a bude tedy vidět. Proto je nutné tentokrát opravdu věneček omotat jehličím celý.
Následně si připravíme zavěšení na věnci – bude záležet na tom, kde budete chtít věnec zavěsit, pokud nad stolem jako já, zvolte zavěšení na 4 stužkách. Ustřihneme stejně dlouhé stužky, které provlečeme věncem a svážeme na konci (stužky jsem umístila vždy naproti sobě). Nakonec můžeme ještě svázat všechny 4 konce.
Nastříháme si další stužky v různých délkách, provlečeme je perníčky, na konci svážeme a uděláme malý uzlík, pomocí aranžérských sponek zapícháme do spodní části věnce, aby visely.
Můžeme ještě dozdobit jinými dekoracemi nebo na část věnce směřujícím ke stropu umístit svíčky.
Pokud nebudete chtít vytvořit závěsný věneček, můžete perníčky použít i na ozdobení klasického věnce na dveře (nedoporučuji ale zavěšovat ven, kvůli vlhkosti). Perníčky připevněte pomocí tavící pistole na věneček, upevněte stužku na zavěšení. Můžete ponechat jen takto jednoduše s perníčky nebo dozdobit dle libosti.


HANGING WREATH WITH GINGERBREADS
Gingerbreads doesn't have to be just for eating. In history, gingerbread was made as a decoration, because the ingredients for baking them were quite expensive. The more I return to natural and simple decorations, the more I like to use a gingerbread as decoration.
I have been using gingerbread as a tree decoration for several years. I am always happy to have handmade decorations on our tree and somehow, I enjoy it more. I was thinking about how else to use gingerbread. I want to create a gingerbread house, but I would have to start decorating for Christmas much earlier, because somehow there is not much time left in December.
Another idea was to use gingerbread for a wreath. In addition to the classic one, I wanted to make a hanging wreath for Christmas for a long time, and this year I finally made it. If you want to make a hanging wreath, think about making holes big enough for ribbons or strings already when baking gingerbread.
I used the same gingerbreads for decoration, but next time I will try a combination of different shapes and types. And if you don't want to hang gingerbread on a wreath, use them as a garland.
WHAT YOU’LL NEED
- wreath
- ribbons hanging gingerbreads
- clips for the wreath for attaching gingerbread ribbons
- gingerbreads
- scissors
INSTRUCTIONS
First, prepare a wreath - make it according to your wish, I have a straw one with different branches and eucalyptus. Since the wreath will hang, it is necessary to remember that the lower side, which we usually leave without branches, will face the ceiling and will therefore be visible. Therefore, this time it is necessary to wrap the entire wreath.
Then, prepare the hanging on the wreath - it will depend on where you want to hang the wreath, if above the table like me, choose hanging on 4 ribbons. Cut ribbons of the same length, put them through the wreath and tie at the end (I always placed the ribbons opposite each other). Finally, you can tie all 4 ends.
Cut other ribbons in different lengths, thread them through gingerbreads, tie at the end and make a small knot, use the organizer clips to stick to the bottom of the wreath so that they hang.
You can also add other decorations or place candles on the part of the wreath facing the ceiling.
If you don't want to create a hanging wreath, you can also use gingerbreads to decorate a classic door wreath (but I don't recommend hanging it outside, due to humidity). Attach the gingerbreads to the wreath using a melting gun, fasten the ribbon for hanging. You can leave it as simple as this with gingerbread or decorate as you wish.


JAK ZACHYTIT KOUŘ NA FOTCE
8. listopadu 2023


Zmrazením pohybu přitáhnete k vaší fotce pozornost. Víte, že ráda zachycuji na svých fotkách pohyb. Nezáleží na tom, jestli mluvíme o moučkovém cukru, polevě nebo kouři.
A protože se blíží období kratších a temnějších dnů, kdy zapalujeme svíčky v našich domovech nebo na koláčích, napadlo mě sepsat vám několik tipů, jak zachytit kouř, aby byly vaše fotografie výjimečné.
Obecně platí, že zachycení pohybu vyžaduje trochu trpělivosti a tréninku. Na zachycení „správného“ tvaru kouře je bylo potřeba více pokusů (někdy nafotím i 50 – 100 fotek). ALE berte to pozitivně. Fotky, které podle vás nejsou dokonalé, nemažte. Můžete je použít k vytvoření stop motion – tedy videa z fotografií. Z jednoho focení tak máte několik výstupů.

JAK ZACHYTIT KOUŘ NA FOTCE
POZADÍ
Zvolte kontrastní pozadí – pokud chcete zachytit bílý / světlý kouř, na začátku je jednodušší zvolit tmavší pozadí. Určitě se to zachytit se světlým pozadím nebo s protisvětlem, ale chce to trochu tréninku.
NASTAVENÍ FOTOAPARÁTU
Obvykle začnu nastavovat rychlost závěrky. Abych zachytila kouř, nastavuji fotoaparát na 1/240 – 1/400 sekundy.
Následně pokračuji se clonou. Mám ráda více rozostřené pozadí, ale záleží také na tom, kolik svíček mám na fotce – v případě, že mám 1, fotím na f/1,8 – 3,5 (v případě makroobjektivu f/5 – 7,1), pokud mám více svíček, fotím na f/4,5 – 5,6.
ISO si upravuji podle podmínek, ale snažím se vyhýbat opravdu vysokému ISO, abych neměla zrnité fotky.
Manuální ostření – většinou volím horní část svíčky (nebo místo, které chci mít ostré), fotoaparát tak bude zaostřovat stále na stejné místo
AKCE
V případě, že máte někoho, kdo vám může sfouknout svíčky, máte štěstí, a stačí stisknout a podržet tlačítko a fotoaparát bude fotit, zatímco jej držíte. To je skvělá volba, budete mít dostatek fotografií ve velmi krátké době.
Pokud jste sami, nainstalujte fotoaparát na stativ a použijte režim kontinuálního focení, kdy fotoaparát zachytí několik snímků (mám 10) v rychlém sledu (mám jednosekundový interval). Také používám 10sekundový časovač, abych měla trochu času připravit se na akci a vybrat nejlepší okamžik, kdy začít sfoukávat svíčky.
DALŠÍ TIP: Také není nutné fotit kouř jen se svíčkami, zkuste použít i zápalky.


HOW TO CAPTURE THE SMOKE
Freezing the movement in your picture makes your photography eye catching. You know, I love to catch movement in my photos. No important if we are speaking about icing sugar, drizzling an icing or catching the smoke, I am always happy to capture it.
And as we are approaching the season of shorter and darker days, when we are lighting the candles in our houses or on our cakes, I was thinking to give you some tips on how to catch the smoke to make your photos outstanding.
In general, capturing a movement needs just a little of patience and training. You would need more tries to capture the „right“ shape of the smoke (sometimes I took even 50 – 100 photos. BUT take it in a positive way. Do not erase the photos you won’t see like perfect, you can use them to create stop motions – a kind of video from photos. So from one shot you have several outputs.
Here are my recommendations:
BACKGROUND
Choose contrasting background – if you want to catch white / light smoke, at the beginning it is easier to choose darker background. For sure you can catch it with light backgrounds or with backlight, but it needs just a little of training.
CAMERA SETTINGS
I usually start to set up the shutter speed. To catch the smoke, I set up my camera in between 1/240 – 1/400 second.
After I make tries with aperture, I love to have more blur background, but it also depends on how many candles I have on my photo – in case I have 1, I shoot on f/1.8 – 3.5 (in case of macro lens f/5 – 7.1), if I have more candles I have f/4.5 – 5.6.
ISO is adjusted based on the conditions, but I try to avoid really high ISO to do not have grainy photos.
Set up manual focus – usually I choose the top of the candle (or the place which I like to have sharp), this way your camera will be still focused on the same place.
ACTION
In case you have somebody who can blow out the candles, you are lucky and you can just click and hold the button and the camera will take pictures while you are holding it. This is a great option as you will have enough photos in very short time.
If you are alone, install your camera on the tripod and use continuous-drive mode when the camera captures several frames (I have 10) in quick succession (I have one-second interval). Also I put 10-second timer, to have some time to prepare for action and to choose the best moment to start blowing out the candles.
ANOTHER TIP: Also is not necessary to catch the smoke only with the candles, but you can use also matches.


SLANÝ SÝROVÝ KOLÁČ S HRUŠKAMI
6. listopadu 2023
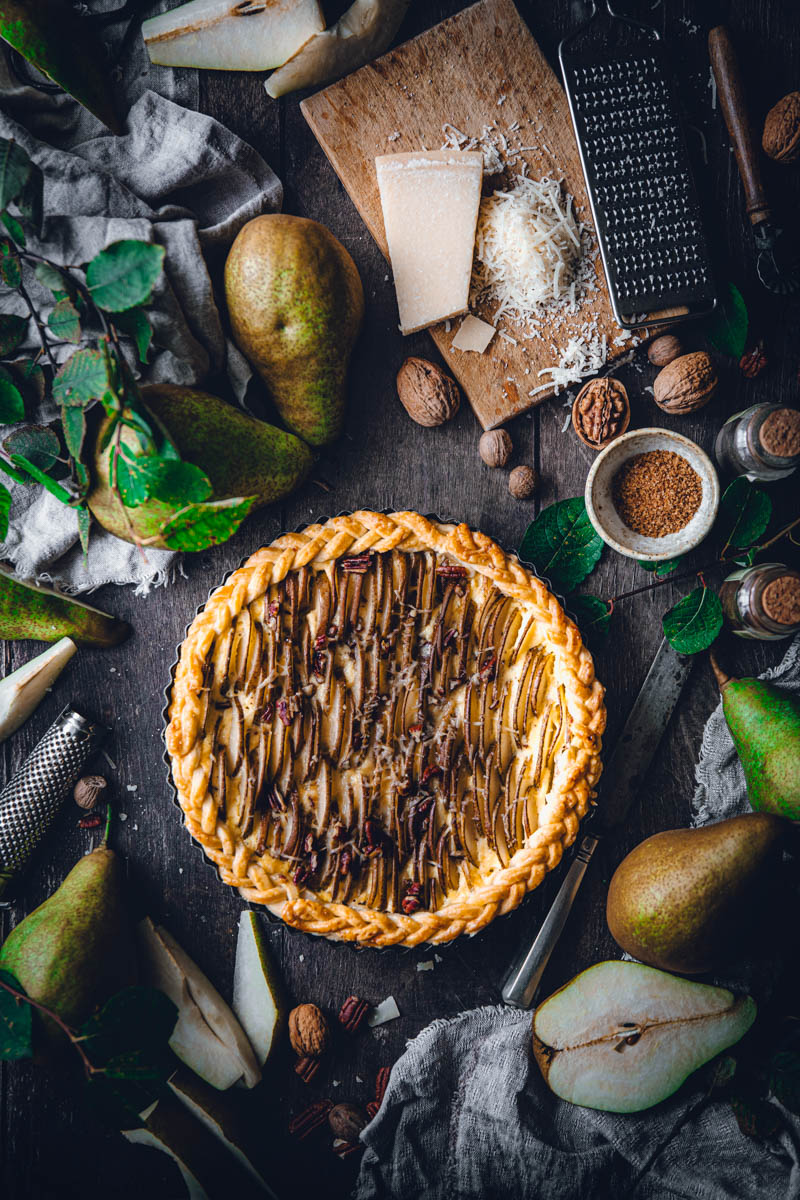

Hrušky nepoužívám pouze při pečení sladkých koláčů. ale s oblibou i do slaných. Protože jejich chuť není úplně výrazná, je nutné ji podtrhnout nějakou výraznější chutí. Proto je moc ráda kombinuji s výrazně chutnajícími sýry, jako je gorgonzola, niva nebo čedar, a s ořechy. Je to taková klasická kombinace, která neomrzí.


SLANÝ SÝROVÝ KOLÁČ S HRUŠKAMI
INGREDIENCE
KORPUS
(vyjde na dno koláče průměr 20 cm + ozdobení)
300 hladké mouky
2 lžíce pískového cukru
1 lžička soli
250 g studeného másla
5 lžic ledové vody
NÁPLŇ
200 g ricotty
200 g gorgonzoly nebo uzené nivy
150 ml smetany
2 vejce
sůl (dle chuti)
pepř
3 – 4 větší hrušky
hrst vlašských nebo pekanových ořechů
1 vejce + 2 lžičky vody + lžíce jemně strouhaného parmezánu
POSTUP
Nejdřív si připravíme těsto.
Mouku smícháme s cukrem a solí, přidáme na kostky nakrájené studené máslo. Prsty nebo nožem vytvoříme drobenku. Po lžících přidáváme vodu a vždy počkáme až se zcela zapracuje. Vytvoříme kompaktní těsto. Zabalíme do potravinové folie a necháme 1 – 2 hodiny chladit v ledničce.
Na náplň smícháme ricottu, nadrobenou gorgonzolu nebo nivu, vejce, smetanu a osolíme, opepříme dle chuti. Vytvoříme krémovou směs.
Hrušky omyjeme, vykrojíme jádřince a nakrájíme na tenké plátky.
Troubu předehřejeme na 180°C, formu na koláč vyložíme pečicím papírem nebo vymažeme máslem a vysypeme hrubou mouku.
Jakmile je těsto vychlazené, rozdělíme jej na 2 poloviny. První polovinu vyválíme, vložíme do formy, vytvarujeme okraje a zbytek odřízneme.
Vyložíme alobalem, na dno vysypeme fazole a vložíme předpéct na 15 minut do trouby.
Z druhé části těsta můžeme vytvořit copánky, mřížku nebo pomocí vykrajovátek různé tvary.
Jakmile bude korpus předpečený, alobal s fazolemi opatrně odstraníme, naneseme sýrovou náplň a položíme na plátky nakrájené hrušky.
Zasypeme nadrobno nakrájenými ořechy a dekorací z druhé části těsta.
V menší misce rozšleháme vajíčko s vodou a pomašlujeme těsto. Nakonec posypeme ještě strouhaným parmezánem.
Dáme zapéct zpět do trouby, pečeme cca dalších 40 – 50 minut nebo dokud těsto nebude mít zlatou barvu.
Po vytažení z trouby necháme vychladnout.


SAVORY GORGONZOLA PIE WITH PEARS
I don't only use pears when baking sweet pies. but they are also great in savory pies. Since their taste is not completely pronounced, it is necessary to underline it with stronger taste. That's why I really like to combine them with strong-tasting cheeses, such as gorgonzola or cheddar, and with nuts. It's such a classic combination that you never get tired of.
INGREDIENTS
SHORTCRUST PASTRY
(pie will be 20 cm in diameter + decoration)
300 all-purpose flour
2 tbsp granulated sugar
1 tsp salt
250 g cold butter
5 tbsp cold water
FILLING
200 g ricotta
200 g gorgonzola
150 ml cream
2 eggs
salt (to taste)
pepper
3-4 larger pears
a handful of walnuts or pecans
1 egg + 2 teaspoons water + a tablespoon of finely grated parmesan
INSTRUCTIONS
Start the preparation with the short crust pastry.
Mix flour with sugar and salt, add cold butter cut into cubes. Make a crumb with your fingers or a knife. Add water spoon by spoon and always wait until it is completely incorporated. Make a compact pastry. Wrap in foil and let cool in the fridge for 1-2 hours.
For the filling, mix ricotta, crumbled gorgonzola or niva, eggs, cream and add salt and pepper to taste. Create a creamy mixture.
Wash the pears, cut out the cores and cut them into thin slices.
Preheat the oven to 180°C, line the cake tin with baking paper or grease it with butter and flour.
Take the pastry out of the refrigerator, divide it in half and roll it out on a floured rolling pin into a round with a thickness of 3-4 mm. Carefully transfer it to the tin using a rolling pin, shape the edges and cut off the rest.
Line with aluminum foil, pour beans on the bottom and place in the oven to pre-bake for 15 minutes.
From the second part of the pastry, make braids, a grid or different shapes using cutters.
Once the bottom is pre-baked, carefully remove the foil with the beans, apply the cheese filling and place the sliced pears.
Cover with finely chopped nuts and decorations from the second part of the pastry.
Beat the egg and water in a small bowl and knead the pie. Finally, sprinkle with grated parmesan.
Put it back in the oven, bake for another 40-50 minutes or until the dough is golden.
Leave to cool after removing from the oven.


WHAT CAMERA GEAR I USE?
29. října 2023


Lately, I often get asked what camera gear I use.
When I started taking photography more seriously, I was dreaming about a SLR camera. At the same time, I didn't want to invest a lot of money in equipment at the beginning, because I didn't know if I will last with it. I read the reviews of the food bloggers I followed and decided between Nikon and Canon. In the end, I decided for Nikon. I bought a D3200 DSLR camera and 50 mm and 24-72 mm basic lenses. I gradually learned and gained experience. I enjoyed taking action shots such as sugaring, icing or smoke, and found that unfortunately the current DSLR camera is not quite ideal. I like to shoot at low ISO, even for these types of photos, and in cloudy weather or low light conditions, the resulting photos were very grainy.
The same goes for a high ISO. It was not always possible to adjust everything in the post process. So, after a long time, I decided to get a new body – I wanted to keep the lenses, so I was looking for a body that would suit me and also so that I wouldn't have to buy new lenses. I stayed with Nikon and bought a digital full frame SLR camera model D850.

But before we will dive into the equipment in more detail, I would like to say that there is no need to have the fanciest camera gear to be a great photographer. The gear does not make the photographer. I can say from my own experience that it is important to practice your skills and creativity. Even though I have – dare I say - good gear, I'm constantly trying new and different things, trying to keep learning - in virtual courses or in person at various workshops, or maybe participating in IG challenges that keep me motivated to try new things and push myself.
The other important thing is also to know your camera. To be honest, I didn't read the whole manual. I always must try everything practically in order to understand the given feature. So sometimes it's a trial-and-error method, which on the other hand is very constructive 😊. However, the more you practice and try, the faster you will get used to the camera and the equipment and master the skills.
If you did not find what you were interested in in the article, feel free to write to me.

WHAT CAMERA GEAR I USE?
CAMERA BODY
I shoot on a full-frame digital single-lens reflex (DSLR) camera, a Nikon D850. The acquisition value is of course high (and I didn't have to invest in new lenses), but for me it's a very versatile camera that can be used for shooting different genres – food, macro, portraits, studio or landscape photos, architecture, etc.
I will not go into detail here about the technical details, they can be studied on the sellers' websites. For me, the D850 is a very versatile camera with excellent image resolution. I was probably most pleased with the high performance at high sensitivities. Even with a high ISO, the photos are practically noise-free. Another advantage comparing with my old model was the ability to connect to the app on my smartphone using Wi-fi, it helps me so much while setting up a scene or shoot if I need to be in the frame. You can also use the app to control the camera. This option was not yet available on my previous camera.
Videos are currently trending. You can shoot both 4K and 8K videos on the Nikon D850. The advantage is that you can choose from several options for setting the number of frames per second. If I'm filming, I use the option to set slow motion – I find this option more convenient compared making the slow motion in the app in post process (I find the video to be smoother than slow motion in the app).

LENSES
When buying a lens, I recommend you think first about what you will be photographing the most. I knew that I would focus mostly on food, so I invested in several lenses. Even though I shoot portraits and nature here and there, I can take high quality photos with what I have. But for nature photography, for example, a telephoto lens would be more suitable. Currently, it is also possible to borrow a lens for testing.
My recommendations:
Another important point when purchasing a lens, is to find out if the lens is compatible with your camera - for Nikon, follow the type of mount. In my case, the Nikon D850 has an F-mount, so if I want to buy a new lens, I must make sure it's suitable for my camera.
I not only use lenses from the Nikon series, but also Tamron or Sigma. I won't lie to you; they came out cheaper and the quality is very high. If you will be purchasing a brand other than the camera brand, make sure again it is suitable for your camera. For example, the Sigma brand produces lenses for both Nikon and Canon.
And now, let’s speak about lenses I use.
SIGMA 24-70 MM F / 2,8
It's the only zoom lens I own and the one I use most often together with the 50 mm lens. I use it most often when shooting overhead scenes or when I need to capture a larger scene. It is very variable lens, it allows me to shoot multiple scenes from different distances and angles, which is an advantage in environments where there is not much space. I also carry it with me when traveling or taking photos in nature. Unfortunately, in these cases, it is a bit bulky since it weighs about 1 kg. If I go purposefully to take photos, I take everything I have with me 😊.

Lens: Sigma 24-70mm f/2.8L – Shot at focal length 44mm – Settings ISO 320; f/5,6; 1/60 sec

Lens: Sigma 24-70mm f/2.8L – Shot at focal length 45mm – Settings ISO 100; f4.5; 1/60 sec


NIKON 50 MM F / 1,8
Another lens I use most often is the 50 mm. I like photos with a high depth of field, so I use this lens most often when shooting scenes, events, and portraits. It works great even in low light conditions. Thanks to the lower weight of the lens, I can hold the camera in my hand without having to use a tripod.


Lens: Nikon 50mm f/1.8 – Settings ISO 500; f4.5; 1/50 sec

Lens: Nikon 50mm f/1.8 – Settings ISO 250; f4.5; 1/40 sec
NIKON 35 MM F / 1,8
This lens was the first one I owned that was "packaged" with the camera. I don't use it much now, but thanks to the depth of field and good lighting characteristics, I use it in some cases when shooting overhead shots, because again I can hold it better in my hand.
SIGMA 105 MM F / 2,8 MACRO
I bought a macro lens only in 2022 because I felt in love with taking macro photos. But you can use it to photograph different angles and scenes - you just have to have enough space around. In terms of sharpness, it is the sharpest lens I have. You can also set 3 ranges of distances at which you take pictures. When photographing wider scenes, I stay at the focus of F 3.5 – 5, 6. When photographing scenes from above, I set to at least F 5.6. When taking macro photos, I also go above F 10.


UV FILTERS
I recommend you get UV filters. I have UV filters on all my lenses. Even though I only have basic ones, I don't need for example a polarizer, the optical glass of the filter will protect the lens from scratches for example - it's better to scratch the filter than the lens. The filters which are currently available on the market are of high quality and will not affect the outcome of the photo in any way. I personally have HOYA brand filters. When getting them, it's important to get the correct diameter to fit your lens.
TRIPOD + C-STAND
I'll be honest, I don't like using them. I like to move around the scene and examine shots from different angles. In addition, I am a terrible nervous person in this case and the various settings completely irritate me 😊. However, it's a matter of habit and I've learned to work with them - I take the camera in my hand, walk around the scene (so I don't have to carry a tripod), find a good shot and then install the camera on the tripod.
When you really need a tripod?
- I don't have any models for photo shoots and all the scenes where there are hands, movement, figure, I make a model myself. So, I wouldn't photograph anything without a tripod.
- Shooting scenes from above – you can't always hold your camera in your hand at a given setting.
- Shooting in poor lighting conditions, at a low ISO or at a high aperture number, when you need, for example, to photograph products or large-format photos without any noise. A tripod is simply a must here.
- Shooting cinemagraphs - a combination of photo and video, when one part is in motion - you need the same scene, which will be covered in the post process
- Shooting stop motions – you take pictures of the same scene in which you basically move things millimeter by millimeter and then combine them into a moving scene, again you need a stable scene so that it looks natural and the same
- Videos
I have a tripod with a folding arm and a C-Stand.
Nowadays, you can find tripods made of lighter materials, which is convenient for carrying and handling. I use a Manfrotto MT190 XPRO4 and a Manfrotto MHXPRO-BHQ2 tripod ball head. I chose this tripod mainly because of the folding central column, which allows me to photograph overhead scenes. But since I'm always nervous about having a small table and having to help myself with a chair and cabinets, I usually climb the ladder anyway and take pictures in my hands. But as I mentioned above, sometimes it's just not possible without a tripod.
The C-Stand is a very sturdy tripod that you can adjust to a height of 2-3 meters. I use a C-stand K1 C-stand 3.3m with a folding arm. In addition to the camera, you can also use it for lights.
My recommendations:
In both cases - if you have tripods with folding arm - I recommend loading (balancing) the arm with some kind of counterweight. If you have a heavier camera with a heavier lens, it likes to tip over.
I also recommend that you check before/when purchasing them that the threads of the camera / tripod head / tripod are compatible (listed in the manuals and on the product pages) or that you have suitable reduction screws (or you must order them).


Lens: Nikon 105mm f/2.8 Macro – Settings ISO 100; f3.5; 1/640 sec (with tripod)
WIRELESS REMOTE
Currently, you can also control the camera remotely.
One option is to connect via cables directly to the program, in which you will then process the photo. You can see a preview of the scene directly in the program. A big advantage is that you can prepare the scene in the process and live preview.
The second option, which I use when taking photos of myself or again when assembling a scene (e.g., when looking from above), is an application on my smartphone. Each brand has its own app – I use Snap Bridge for Nikon. The application is connected to the camera via wi-fi and allows me to directly control the camera settings - ISO, focus, aperture, exposure, etc. (live view in the camera must be turned off). You can also set a timer here – a great option if you need both hands in the shot. Minus points for me - it is not possible to take multiple photos at once (or I haven't figured it out) and Wi-Fi only works at a certain distance from the camera - for example, when I was taking pictures outside and wanted to take a picture in the distance, the connection was disconnected - on the other hand, it can be solved by changing the lens 😊.
DIFFUSER AND REFLECTOR
The diffuser serves to disperse the light. It is sold in different sizes. But you can just as well use a curtain.
Some models of diffusers can also be purchased with reflectors for light reflection or absorption.
But you can use cheaper versions instead:
- white paper or polystyrene to direct the light reflection away from the light source onto the object
- mirror / plate with foil
- I use black paper/board for a change to absorb light
OTHER EQUIPMENT
I recommend getting (and always have with you):
- spare batteries (buy at least 2), which will be charged. There's nothing worse than running out of battery in the middle of a photo shoot.
- spare cards – I personally have 2, but of course it depends if you need them depending on what you are shooting). At the same time, before taking photos, I check how much space there is. You must keep in mind that you want to shoot videos at the same time, they take up much more space. Also, check if the card is suitable for videos before purchasing (not all cards are suitable).
- an external disk - it will come in handy. Photos and videos, especially if you shoot in RAW format, take up a lot of space. The same catalogs of editing programs and the resulting photos. I use a SanDisk Extreme Pro Portable V2 SSD 2TB, which during my activities can back up approximately 1-1.5 years of photos, including RAW formats and videos. Of course, it is also more affordable for me to buy regularly over a longer period of time, a direct proportion applies here too: more space = higher price 😊.
PHOTOS AND VIDEOS EDITING
I don't know any photographer who doesn't edit the photos afterwards (at least the digital ones). I will only give you the programs, because I think that there is no point in detailing anything more in this article 😊:
Photos - Lightroom
Videos - I'm using Lightroom for now because I'm trying to make the videos match the photos in style. But no big miracles can be done in LR. Basically, only very basic values can be adjusted, and presets can be used.
Videos - Zoner - a Czech program that I got used to more than Adobe Premiere Pro. I use it to cut videos, change videos to portrait, compose videos, etc. In addition, there is an option to create stop motions and cinemagraphs, so I don't need other applications. Plus, more affordable than monthly app subscriptions.
And that's all for now... I hope I haven't forgotten anything, and if so, let me know if you're interested in more details.


Social Icons